從零開始使用Esp32開發板 (Docker)
📌 開發環境簡介
硬體
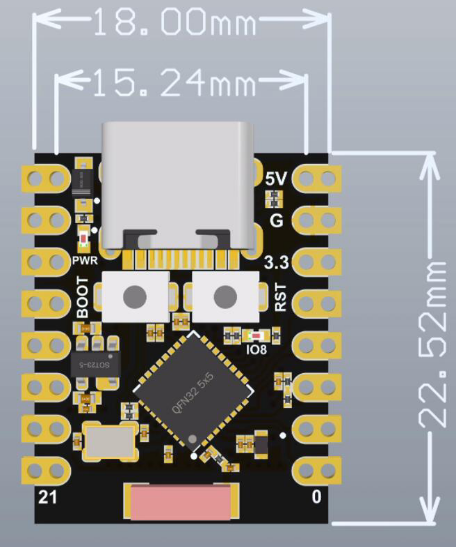
- 開發板: ESP32-C3-SuperMini Datasheet Link
- 配件: USB-TypeC 線
軟體
- Docker: 4.43.1
- 開發環境之作業系統: WUbuntu-22.04
- 開發環境之IDE: Visual Studio Code
- 開發環境之SDK: Esp-idf v5.5.1
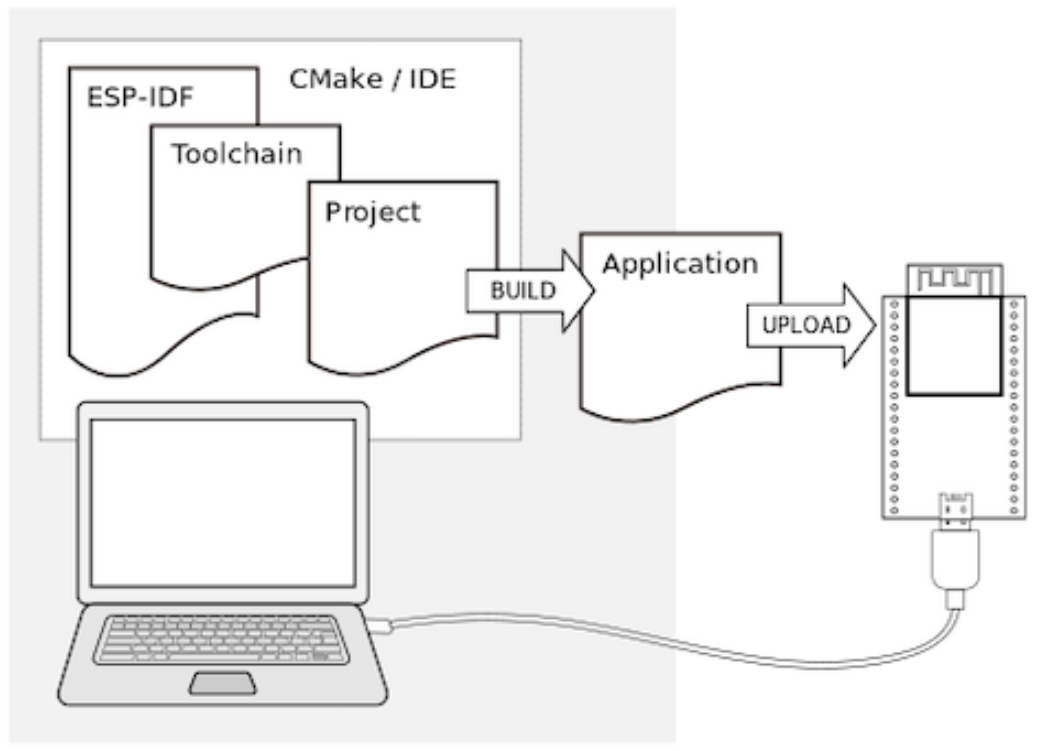
- Toolchain to compile code for ESP32
- Build tools - CMake and Ninja to build a full Application for ESP32
- ESP-IDF that essentially contains API (software libraries and source code) for ESP32 and scripts to operate the Toolchain
📌 第一步: 使用Docker安裝Esp-idf SDK
請先將以下安裝完畢:
Docker.desktop
Windows WSL - Ubuntu
Visual Studio Code
usbipd-win
安裝好後,打開Docker.desktop.
[建議] 建立新的 VS Code設定檔
使用VS Code的一大好處,使用不同的設定檔,可以隔離開不同環境,每個環境下我們可以安裝不同的模組。 版本更迭,我們也可建立新的設定檔,新舊間可快速切換。
然後將以下延伸模組安裝:
- Dev Container
- Remote Development
新增資料夾,準備放我們的Project。 在VS Code中開啟資料夾為我們的工作區。
安裝ESP-IDF 在 Docker Container
開啟新資料夾後,這邊同時建議可以加入git管理 (git init)。
然後我們透過快捷鍵 ctrl + shit + p,叫出Command Palette。
搜尋 Dev Container: Add Dev Container Configuration Files,創建我們的設定檔。
這邊會跳出一些選項,並讓你選擇預設的初始範例,這邊可以選esp-idf範例。
接下來上面步驟會創建 .devcontainer/資料夾,並應該會有兩個檔案
Dockerfile: 腳本,執行要安裝的套件步驟devcontainer.json: 參數設定
下面給出我的範例,重點是固定我們esp-idf版本,有利我們之後統一版本控制。
Dockerfile
ARG DOCKER_TAG=release-v5.5
FROM espressif/idf:${DOCKER_TAG}

ENV LC_ALL=C.UTF-8
ENV LANG=C.UTF-8

RUN apt-get update -y && apt-get install udev -y

RUN echo "source /opt/esp/idf/export.sh > /dev/null 2>&1" >> ~/.bashrc

ENTRYPOINT [ "/opt/esp/entrypoint.sh" ]

CMD ["/bin/bash", "-c"]
devcontainer.json
{
    "name": "ESP-IDF QEMU",
    "build": {
        "dockerfile": "Dockerfile"
    },
    "customizations": {
        "vscode": {
            "settings": {
                "terminal.integrated.defaultProfile.linux": "bash",
                "idf.espIdfPath": "/opt/esp/idf",
                "idf.toolsPath": "/opt/esp",
                "idf.gitPath": "/usr/bin/git"
            },
            "extensions": [
                "espressif.esp-idf-extension",
                "espressif.esp-idf-web"
            ]
        }
    },
    "runArgs": ["--privileged"],
    "mounts" : ["source=/dev/ttyACM0,target=/dev/ttyACM0,type=bind"]
}
接著再次叫出Command Palette,然後搜尋
Dev Containers: Open Workspace in Container...
開啟進入Container
📌 第二步: 嘗試與電腦連線
不斷重連斷線問題
新的開發板拿到,不確定裡面有無燒錄程式,有機會遇到一插上線連接電腦,不斷連線與斷線。 這時可以同時按板子上的Boot與Reset按鈕,進入燒錄模式。
板子上的BOOT按鈕,按下時下拉GPIO9 Pin,否則預設Reset完進入SPI boot mode
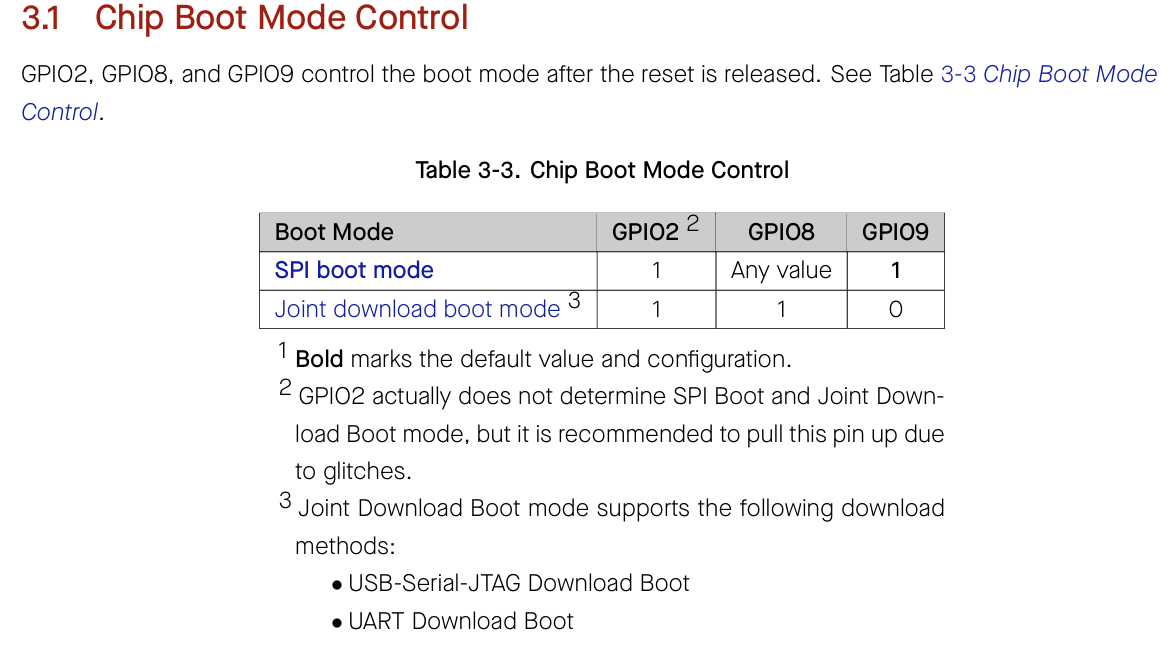
In Joint Download Boot mode, users can download binary files into flash using UART0 or USB interface. It is also possible to download binary files into SRAM and execute it from SRAM.
🧑💻 Code Example